The modern era of virtual reality really kicked off in earnest just over a decade ago, when the Oculus Rift promised 3D worlds beyond your wildest dreams. Since then, nobody’s been able to come up with a killer app to convince even a mild fraction of consumers to engage with the technology. Still, if you’re keen to tinker, you might like to make your own headset like [CNCDan] has done.
The build is based almost entirely on 3D-printed components and parts sourced from AliExpress. It offers 2880x1440p resolution, thanks to a pair of square 1440×1440 LCD displays, one for each eye, paired with a couple of 34 mm lenses. The headset has adjustable interpupiliary distance so you can dial the view in to properly suit your eyes. The 3D-printed housing is designed to be compatible with headrest pads from the HTC Vive Pro for comfort’s sake. Head tracking is also available, with the inclusion of an IMU and an Arduino onboard. [CNCDan] apparently put the build together for under $150, which is not bad compared to the price of a commercial off-the-shelf unit. Files are on Github for the curious.
[CNCDan] reports good results with the DIY headset, using it primarily with his racing simulator setup. He has had some issues, however, with his LCD screens, which don’t properly run at a 90 Hz refresh rate at full resolution, which is frustrating. It’s an issue he’s still looking into. We’ve seen some other neat VR builds over the years, too. Video after the break.
This build goes a bit of a different route to many other DIY keyboards out there, in that [Lambert] was keen to build it around an FPGA instead of an off-the-shelf microcontroller. To that end, the entire USB HID stack was implemented in VHDL on a Lattice ECP5 chip. It was a heavy-duty way to go, but it makes the keyboard quite unique compared to those that just rely on existing HID libraries to do the job. This onboard hardware also allowed [Lambert] to include JTAG, SPI, I2C, and UART interfaces right on the keyboard, as well as a USB hub for good measure.
As for the mechanical design, it’s a full-size 105-key ISO keyboard with one bonus key for good measure. That’s the coffee key, which either locks the attached computer when you’re going for a break, or resets the FPGA with a long press just in case it’s necessary. It’s built with Cherry MX compatible switches, has N-key rollover capability, and a mighty 1000 Hz polling rate. If you can exceed that by hand, you’re some sort of superhuman.
A book of mechanical actions is a wondrous thing — mechanically inclined children have lost collective decades pouring over them over the generations. What could possibly be better? Why, if the mechanisms in the book were present, and moved! That’s exactly what [AxelMadeIt] produced for a recent video.
Being just four pages, you might argue this is but a pamphlet. But since it takes up a couple inches of shelf space, it certainly looks like a book from the outside, which is exactly what [AxelMadeIt] was going for. To get a more book-like spine, his hinge design sacrificed opening flat, but since the pages are single-sided, that’s no great sacrifice.
At only 6 mm (1/4″) thick, finding printable mechanisms that could actually fit inside was quite a challenge. If he was machining everything out of brass, that would be room for oodles of layers. But [Axel] wanted to print the parts for this book, so the mechanisms need to be fairly thick. One page has a Roberts linkage and a vault-locking mechanism, another has planetary gears, with angled teeth to keep them from falling out. Finally, the first page has a geneva mechanism, and an escapement, both driven by a TPU belt drive.
All pages are driven from an electric motor that is buried in the last page of the “book”, along with its motor, battery, and a couple of micro-switches to turn it on when you open the book and off again when you reach the last page. Rather than a description of the mechanisms, like most books of mechanical actions, [Axel] used multi-material printing to put lovely poems on each page. A nice pro-tip is that “Futura”, a font made famous by flying to the moon, works very well when printed this way. If you just want to watch him flip through, jump to 8:00 in the video.
This reminds us of another project we once featured, which animated 2100 mechanical mechanisms. While this book can’t offer near that variety, it makes up for it in tactility.
As the best-selling video game of all time (sorry, Mario!), there is no question that Minecraft is a big deal. When gamers put down their controllers to take a break from playing virtual LEGOs in the Overworld, they even flock to the movie theater to watch a Minecraft adventure play out on the big screen. But YouTuber PortalRunner wanted to take this hugely successful video game franchise and stuff it into a really small package, because as we all know, things that are either really large or really small are objectively better than normal-sized items.
In particular, PortalRunner set out to shrink the size of a Minecraft server. These servers facilitate multiplayer experiences in a single, shared world. Just how small was PortalRunner thinking? Maybe a Raspberry Pi comes to mind for you? Oh no, that would be way too easy, think again! Believe it or not, PortalRunner shrunk a minimalist Minecraft server all the way down to ESP32 size.
Actual gameplay (: PortalRunner)
That is a very tall order, so some compromises had to be made. By necessity, memory usage and performance were prioritized over features, so you may run into the occasional issue. But hey, the server is running on an ESP32, so what did you expect? The chip has only 400KB of SRAM and a processor that runs at 160MHz, so getting it working at all is quite a feat.
No need for you to check, Mojang Studios does not officially support the ESP32 (obviously). So PortalRunner wrote a custom Minecraft server, from the ground up, in C. Since every last drop of performance must be squeezed out of the chip, PortalRunner had to work very close to the bare metal. This fact gave the project its name — bareiron.
One of the major areas where features were dialed back in favor of performance was in terrain generation. The game uses procedural generation to create random-ish worlds each time a new game is started. But that process takes a lot of compute power and memory on the server side. Those resources are in short supply on the ESP32, so PortalRunner devised an alternative method that achieved the same basic goals with far less computational resources.
Many other such optimizations were built into the custom server, which enabled it to load game chunks within 200ms. That is fast enough to be smoothly playable, even if some corners had to be cut to make it possible.
All of this leaves one question remaining: Why? Why would anyone want to host a Minecraft server on a tiny microcontroller? I suppose one could argue that it saves energy, or something along those lines, but for the most part, it really doesn’t make sense for any reason other than being able to say that you did it. And if you do want to do it, the bareiron source code is available on GitHub under a permissive GPL-3.0 license.
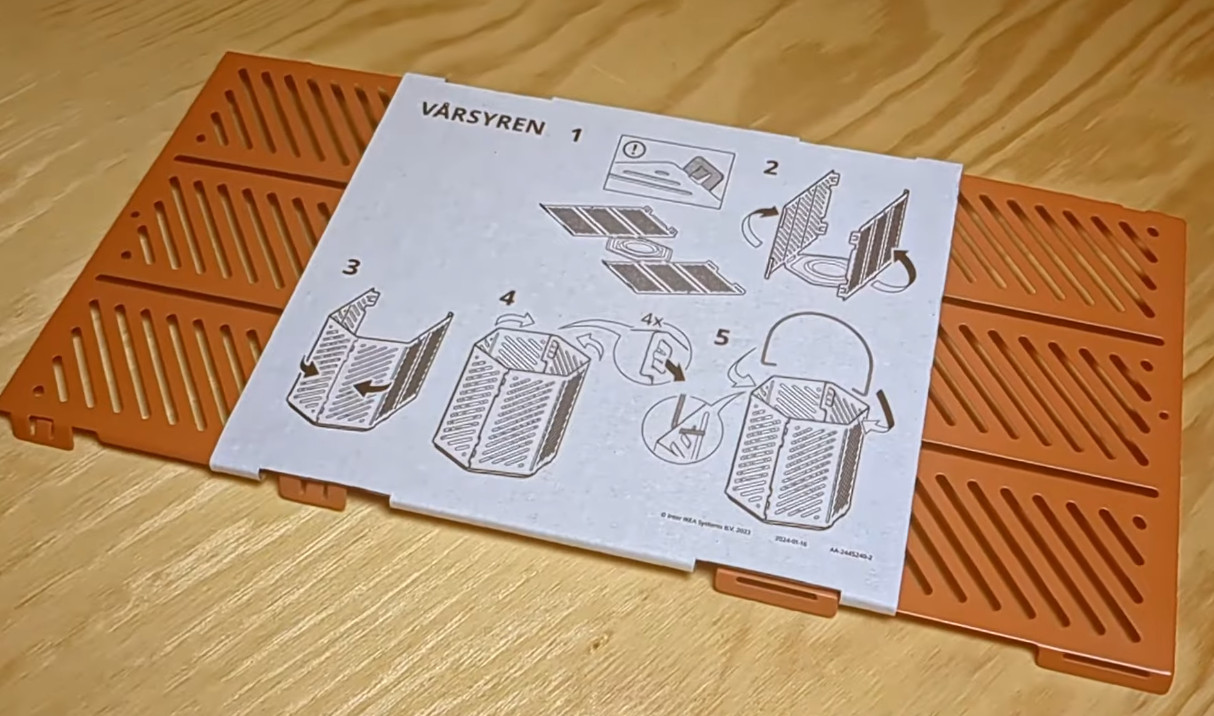
It’s fair to say that the average Hackaday reader enjoys putting together custom electronics. Some of those builds will be spaghetti on a breadboard, but at some point you’ll probably have a project that needs a permanent case. If you’re looking for a small case for your latest creation, check out [Julius Curt’s] modification of an IKEA Vårsyren lantern into a customizable enclosure!
Like most things IKEA, the Vårsyren lantern is flat pack — but rather than coming as a collection of wooden components, the lantern is made of sheet metal. It’s hexagonal in shape with a pair of three sided panels, so [Curt] simply snaps one of them off to make three sides of the final case. The other three sides are 3D printed with the STEP files provided so the case can be made to fit anything around 60x60x114 mm in size.
Cette communauté en constante expansion est devenue au fil du temps une référence en matière de CAO, regroupant aujourd’hui des ingénieurs et des concepteurs issus de plus de 1,3 million d’entreprises dans 195 pays, venus rechercher des modèles CAO de composants à intégrer dans leurs projets.
La société TraceParts, qui fournit l’une des principales plateformes de contenu CAO pour l’ingénierie et la conception industrielle, vient de franchir le seuil des six millions d’utilisateurs inscrits, un jalon qui reflète non seulement le succès de cette plateforme de CAO mais également l’importance croissante des modèles de CAO dans les processus de conception et d’approvisionnement des différents domaines de l’industrie. Cela d’autant que la tendance s’accélère, la barre des six millions d’utilisateurs inscrits étant atteinte moins de deux ans et demi après celle des cinq millions d’utilisateurs – c’était en avril 2023 – alors qu’il avait fallu trois et demi pour passer de quatre à cinq millions d’utilisateurs.
Cette communauté en constante expansion est ainsi devenue au fil du temps une référence en matière de CAO, regroupant aujourd’hui des ingénieurs et des concepteurs issus de plus de 1,3 million d’entreprises dans 195 pays, venus rechercher des modèles CAO de composants à intégrer dans leurs projets. La plateforme de TraceParts met à disposition plus de 2100 catalogues de produits en 3D et 108 millions de références produit et fournit un accès gratuit à des milliards de fichiers techniques, dont des dessins 2D, des modèles 3D, des fiches produits et des configurateurs, disponibles dans plus de 60 formats CAO. De quoi répondre aux besoins actuels de numérisation des procédés et opérations de conception, d’achat, de fabrication et de maintenance dans pratiquement tous les secteurs industriels.
Fondée en France et appartenant au groupe Trace fondé en 1990, la société TraceParts s’est développée avec des bureaux en Allemagne, aux États-Unis et en Chine, ainsi que des partenaires en Italie et en Turquie.
How hard can it be to create your own inductors? Get a wire. Coil it up. Right? Well, the devil is definitely in the details, and [Nick] wants to share his ten tips for building “the perfect” inductor. We don’t know about perfect, but we do think he brings up some very good points. Check out his video below.
If you are winding wire around your finger (or, as it appears in the video, a fork) or you are using a beefy ferrite core, you’ll find something interesting in the video.
Of course, the issue with inductors is that wires aren’t perfect, nor are core materials. Factors like this lead to inefficiency and loss, sometimes in a frequency-dependent way.
It looks like [Nick] is building a large switching power supply, so the subject inductor is a handful. He demonstrates some useful computational tools for analyzing data about cores, for example.
We learned a lot watching the tricks, but we were more interested in the inductor’s construction. We have to admit that the computed inductance of the coil matched quite closely to the measured value.
A few years ago, I bought an 8 mm home movie camera in a second hand store. I did a teardown on it here and pulled out for your pleasure those parts of it which I considered interesting. My vague plan was to put a Raspberry Pi in it, but instead it provided a gateway into the world of 8mm film technology. Since then I’ve recreated its Single 8 cartridge as a 3D printable model, produced a digital Super 8 cartridge, and had a movie camera with me at summer hacker camps.
When I tore down that Single 8 camera though, I don’t feel I did the subject justice. I concentrated on the lens, light metering, and viewfinder parts of the system, and didn’t bring you the shutter and film advance mechanism. That camera also lacked a couple of common 8 mm camera features; its light metering wasn’t through the lens, and its zoom lens was entirely manual. It’s time to dig out another 8 mm camera for a further teardown.
A Different Camera To Tear Down
The camera with a Super 8 cartridge inserted.
My test camera is a battered and scuffed Minolta XL-250 that I found in a second hand store for not a lot. It takes Super 8 cartridges, of which I have an expired Kodachrome example for the pictures, and it has the advantage of an extremely well-thought-out design that makes dismantling it very easy. So out it comes to be laid bare for Hackaday.
Once the sides have come off the camera, immediately you can see a set of very early-70s-analogue PCBs containing the light metering circuitry. Typically this would involve a CdS cell and a simple transistor circuit, and the aperture is controlled via a moving coil meter mechanism. This camera also has a large mostly-unpopulated PCB, giving a clue to some of the higher-end features found on its more expensive sibling.
The left hand side of the camera internals
The right hand side of the camera internals
Turning our attention inside the camera to the film gate, we can see the casting the film cartridge engages with, and the frame opening for the shutter To the left of that opening is a metal claw that engages with the sprocket holes in the film, thus providing the primary film advancement. The metal claw is attached to a slider on the back of the film gate, which in turn is operated by the rotation of the shutter, which is the next object of our attention.
The film gate is the silver component in the middle of the picture. The film advance claw is at its bottom left.
The back of the film gate assembly showing the film advance slider.
The shutter is a disc that spins at the frame rate, in this case 18 frames per second. It sits in the light path between the back of the lens system and the film gate. It has a segment cut out of the disc to let light through for part of the rotation, this is how it operates as a shutter. On its reverse is the cam which operates the slider for the film advancement claw, while its front is mirrored. This forms part of the through-the-lens light metering system which we’ll come to next.
The rear of the shutter (film side), showing the cam in the centre for the film advance.
The front of theshutter, showing the mirror for the light sensor.
The shutter in place. To its left attached to the PCB you can see the silver cylindrical light sensor.
The mirror on the front of the shutter is angled, which means that when the shutter is closed, the light is instead reflected upwards at right angles into a prism, which in turn directs the light to the light meter cell. The PCB on the other side must have a charge pump which takes this 18 Hz interrupted analogue signal and turns it into a DC to drive the moving coil mechanism. There’s a 10 uF capacitor which may be part of this circuit.
The W/T rocker operates this chain of levers.
The levers engage with the gearbox tucked under the lens.
Finally, we come to the powered zoom feature that was missing from the previous camera. On the top of the camera is a W/T rocker, for Wide/Telephoto. that operates the zoom. It is connected to a set of levers inside the case, which emerge as a pin at the front of the camera below the lens. This engages with a small gearbox that drives a knurled ring on the lens body, and selects forward and reverse to turn the ring. It’s driven by the same motor as the shutter, so it only works when the camera is operating.
I hope this look at my Minolta has filled in some of the gaps left by the previous article, and maybe revealed that there’s more than meets the eye when it comes to 8 mm movies. Careful though. If you dip a toe into this particular puddle it may suck you in head first!
He starts by demonstrating the vending process: a backlit vend button is pressed, an animation plays on the screen as a synthetic voice speaks through attached speakers, the vending mechanism rotates until a successful vend is detected with a photoelectric sensor (a photoresistor and an LED) or a timeout of 10 seconds is reached (the timeout is particularly important for cases when the stock of prizes is fully depleted).
For a successful vend the prize will roll out a vending tube and through some ramps, visible via a perspex side panel, into the receptacle, as the spooky voice announces the vend. It’s the photoelectric sensor which triggers the mask to speak.
The vending mechanism is a wheel that spins, the bouncy balls caught in a hole on the wheel, then fall through a vending tube. The cache of prizes are stored in a clear container attached to the top, which is secured with a keyed lock attached to the 3D printed lid. After unlocking the lid can be removed for restocking.
The whole device is built into an old PC case tower. The back panels have been replaced and sealed. The computer in the box is an ASUS CN60 Chromebox running Ubuntu Linux. The power button is obscured on the back of the case to avoid accidental pressing. The monitor is bolted on to the side panel with a perspex screen and connected to the Chromebox via VGA. Inside there are two power supplies, an Arduino Uno microcontroller, and an audio amplifier attached to a pair of speakers.
A 12V DC motor controls the vending prize wheel which feeds a prize into the vending tube. The vending tube has an LED on one side and a photoresistor on the other side that detects the vend. The software, running on Linux, is Python code using the Pygame library.
As we all look across a sea of lifeless, nearly identically-styled consumer goods, a few of us have become nostalgic for a time when products like stereo equipment, phones, appliances, homes, cars, and furniture didn’t all look indistinguishable. Computers suffered a similar fate, with nearly everything designed to be flat and minimalist with very little character. To be sure there are plenty of retro computing projects to recapture nostalgia, but to get useful, modern hardware in a fun, retro-themed case check out this desktop build from [Mar] that hides a few unique extras.
The PC itself is a modern build with an up-to-date operating system, but hidden in a 386-era case with early-90s styling. The real gem of this build though is the floppy disk drive, which looks unaltered on the surface. But its core functionality has been removed and in its place an Arduino sits, looking for NFC devices. The floppy disks similarly had NFC tags installed so that when they interact with the Arduino,it can send a command to the computer to launch a corresponding game. To the user it looks as though the game loads from a floppy disk, much like it would have in the 90s albeit with much more speed and much less noise.